|
Please note; this model is currently unfinished, in particular the details on the head are missing. |
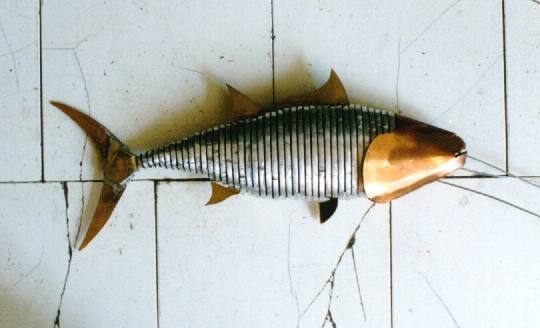
| The model should look something like this, be fairly flexible and float like a rock. |
| This is not as complicated as the model the MIT folk have made, you won't need a degree in robot science |
| But you will need time and the following: |
| Minimum Construction Requirements: |
| * 3mm thick, Sheet Aluminium |
| * 1mm thick, Brass Sheet (A5 size) |
| * 1mm thick, Copper Sheet (A5 size) |
| * Many small washers or bike inner-tube |
| * Cycle cable to go through washers |
| * nipple-less cable clamps (?) |
| * Hack-saw & Blades |
| * Drill with 2mm Bit |
| * Clamp & WorkTop |
| * Metal File |
| Recomended Construction Requirements: |
| * 3mm thick, Sheet Aluminium |
| * 1mm thick, Brass Sheet (A4 size) |
| * 1mm thick, Copper Sheet (A5 size) |
| * Many small washers or bike inner-tube |
| * Cycle cable to go through washers |
| * nipple-less cable clamps (?) |
| * Bench Jig-saw & Blades |
| * Drill with 2mm Bit |
| * Soldering iron |
| * Vice & Workbench |
| * Metal File |
| You could use any stiff material that can be cut and drilled. I used aluminium because it's easy to file. |
| If you're thinking of making this as a present for
some-one make sure you love them very much. |
| Instructions: |
| 1. Down-load and print the 4 template sheets below. (make sure they are all in the same size) | |
| 2. Cut and stick the rib templates onto the aluminium sheet and drill the cable holes for each rib. | |
| 3. Cut out the aluminium ribs, losely thread them onto the cables with spacer washers. | |
| 4. Decide at this stage how many spacing washers you need between ribs for flexibility. | |
| 5. File the ribs roughly to shape. | |
| 6. Cut and stick the fin templates (with their tabs) onto the brass sheet and cut out. | |
| 7. Mark, on the relevant ribs, where the fin tabs need slots to be cut. | |
| 8. Cut the slots on the fin holding ribs, with a notch to enable the fin tab to lock in place. | |
| 9. Thread the cable onto the tail-fin holder, fold and solder the tail-fin into place. | |
| 10. Thread all the ribs, washers and fins. | |
| 11. At this stage, holding the cables taught you should have an idea what bits need further filing. | |
| 12. Cut out the Head, using the head template and bend to shape. | |
| 13. Work out a way of attaching the head to the body. | |
| 14. Tighten and hold the body on the cables using the cable clamps. | |
| NB. You could cut out rubber discs, cut from an inner-tube, to use as rib spacers instead of using washers. |
| Click on the template format you would like to use. (self extracting files - save to a new folder) | Turbo Cad for Windows | Drawing eXchange | AutoCAD Native | |
| Alternatively get self extracting files in BMP format but remember to keep all scales consistent when printing |
Is making this a real pain under the gills ? Then e-mail: stagbeetle@stagbeetle.plus.com for sympathy.